Lesson 9The Toolchain — Nine Tools, Properly Placed
Welcome to Module 5: the Local AI Ecosystem — the lesson where every tool this course has name-dropped gets its proper introduction. Fair warning about what changes here: the theory is done. You already understand GGUF, PagedAttention, LoRA, chat templates, and bandwidth ceilings — so each tool profile today is short on new concepts and long on positioning: what it is, what it's built on, and exactly when you reach for it. Nine tools, one map. Here's the map first:
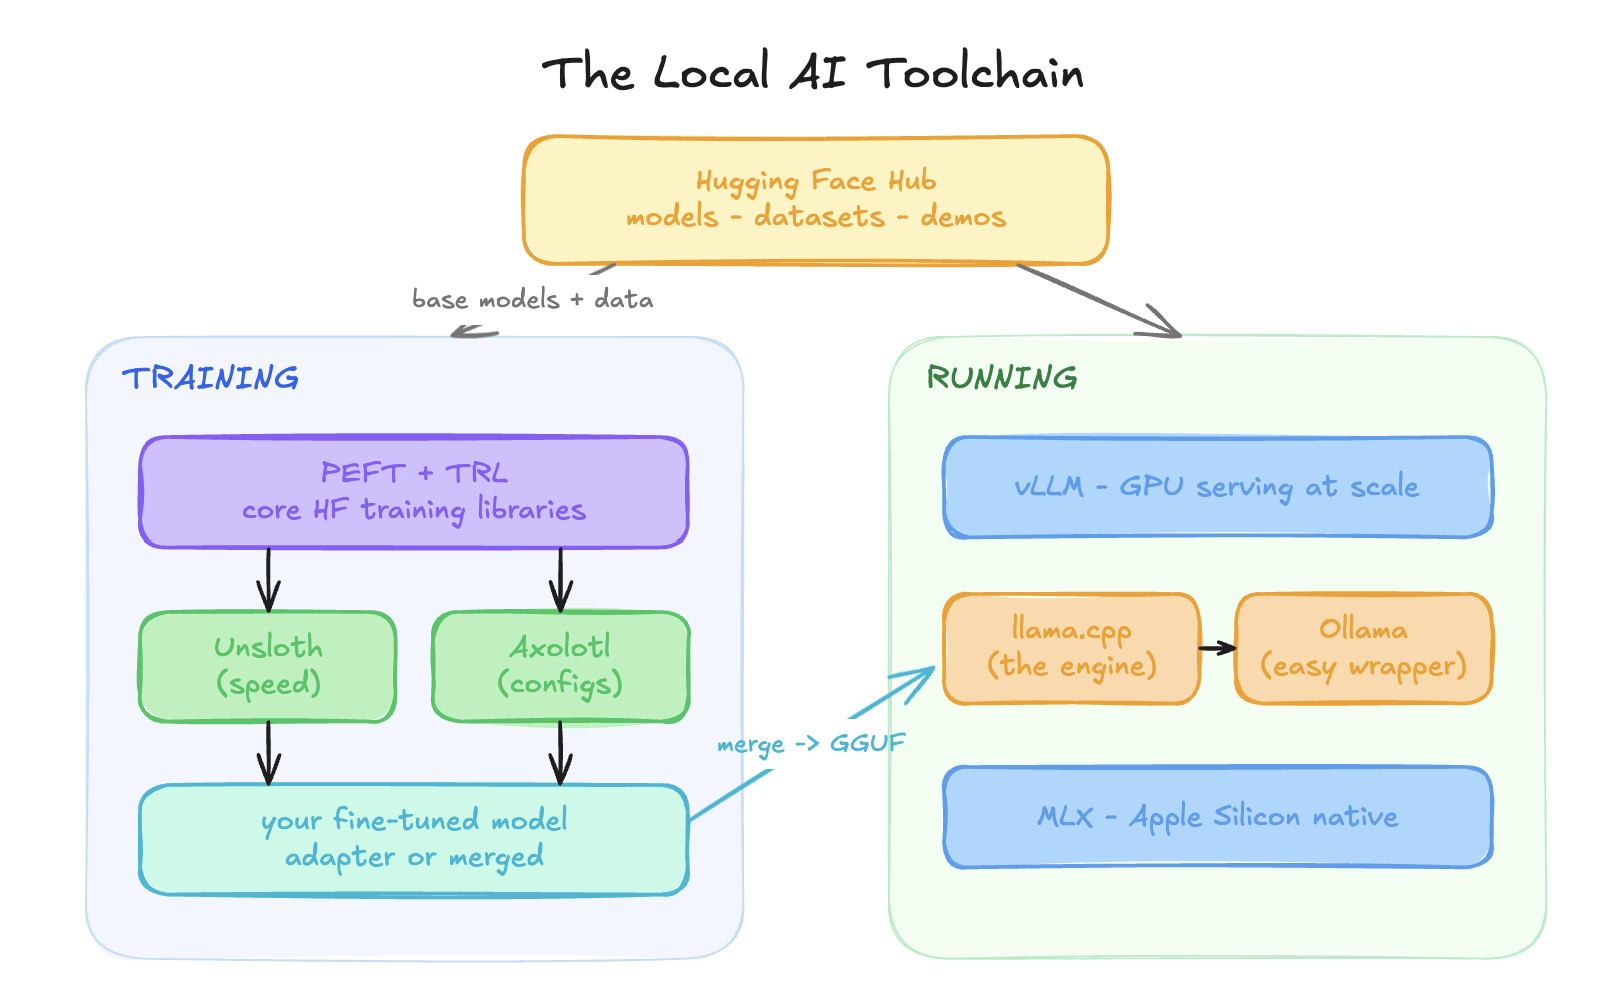
Part 1 — Running Models
Topic 39: llama.cpp — the engine everything else wraps
The origin story is genuinely important for understanding the ecosystem: in March 2023, Georgi Gerganov spent a weekend porting Meta's leaked-then-released LLaMA weights to plain C++ so it would run on his MacBook. No PyTorch, no Python, no CUDA — just a single compiled program. That weekend hack became the foundation of all consumer local AI.
What it is today: a dependency-free C/C++ inference engine that runs on essentially anything — CPUs (with hand-tuned SIMD kernels), Apple Metal, NVIDIA CUDA, AMD, Vulkan, phones, Raspberry Pis. It's the native home of everything from Topic 29: GGUF is its format, the K-quants are its inventions. Ollama, LM Studio, Jan, GPT4All — all of them are friendly bodies built around this engine block.
Its signature capability, which no GPU-first framework matches: partial offload. The -ngl N flag puts N layers on the GPU and runs the rest on CPU — so a model slightly too big for your VRAM still runs, just slower (you know exactly why from Topic 31: the CPU-resident layers eat the PCIe/bandwidth penalty). Graceful degradation instead of OOM.
The binaries worth knowing: llama-cli (direct chat), llama-server (an OpenAI-compatible endpoint — Topic 37's lingua franca, from a single executable), llama-quantize (you met it in Topic 29), and llama-bench (the honest way to measure your Topic 34 predictions).
Summary
The universal C++ inference engine underneath consumer local AI; GGUF's home; runs anywhere, degrades gracefully.
Mental model
The engine block an entire car industry builds brands around.
Mistakes to avoid
Reaching for it first as a beginner (Ollama wraps it better for daily use — go direct only when you need control: custom quants, benchmarking, edge targets). And forgetting -ngl exists, running fully on CPU while a perfectly good GPU idles.
Exercise
Clone and build it (cmake -B build && cmake --build build), then run llama-bench on a GGUF you already have. Compare its measured tok/s against your Topic 34 prediction and your Ollama measurement — three numbers, one theory.
Topic 40: Ollama — the Docker of local models
If llama.cpp is the engine, Ollama is the product: one install, then models become as easy as containers. The Docker analogy isn't loose — it's the literal design:
| Docker | Ollama |
|---|---|
docker pull nginx | ollama pull llama3.1:8b |
| Docker Hub | ollama.com registry |
| Dockerfile | Modelfile (FROM, SYSTEM, PARAMETER) |
docker run | ollama run |
What it silently handles — each item a scar you now recognize: quant selection (default pulls are typically Q4_K_M, Topic 29's sweet spot; tags like :8b-instruct-q8_0 pick others), chat templates (Topic 15's silent killer, defused), model loading/keep-alive, Metal/CUDA detection. And it runs a local server on port 11434 speaking the OpenAI dialect, which means this works against everything you'll ever build:
from openai import OpenAI
client = OpenAI(base_url="http://localhost:11434/v1", api_key="ollama")
r = client.chat.completions.create(model="llama3.1:8b",
messages=[{"role": "user", "content": "hello"}])Same three lines, different base_url, and your app switches between local Ollama, a vLLM cluster, or a commercial API. You used Ollama in Topics 29 and 34; now you know its whole shape. Its honest limit: it's single-user-oriented — some parallelism, but not built for real concurrent load. That's the next topic's job.
Summary
Friendly llama.cpp wrapper with registry, Modelfiles, and an OpenAI-compatible local server; the default way individuals run local models.
Mental model
Docker, for models.
Mistakes to avoid
Serving an actual user base from it (wrong tool — vLLM exists), and forgetting that ollama run model on an 8 GB machine with a 14 GB model will offload and crawl — the Topic 31 budget math still governs everything.
Exercise
Write a Modelfile that wraps a base model with the persona from your Lesson 6 fine-tune's system prompt (FROM llama3.1:8b, a SYSTEM block, PARAMETER temperature 0.3), then ollama create and compare its behavior against your actual fine-tuned GGUF. You're empirically re-testing the Topic 12 ladder: how far does prompting alone get you?
Topic 41: vLLM — Topic 37, installable
You already know vLLM's soul: PagedAttention and continuous batching — it's the reference implementation of half of Lesson 8. The practical layer:
pip install vllm
vllm serve Qwen/Qwen2.5-7B-Instruct --max-model-len 8192
# → OpenAI-compatible server on :8000Note what it pulls: standard Hugging Face repos (safetensors) — vLLM lives in the GPU/datacenter world, not the GGUF world (its quant formats are GPTQ, AWQ, FP8 from Topic 24). The flags that matter are your Module 4 concepts wearing names: --max-model-len (caps per-request KV budget — your Topic 31 purple segment, now a dial), --gpu-memory-utilization (how much of the pantry to claim), --tensor-parallel-size (Topic 37's layer-splitting across GPUs, for 70B+), --enable-lora (Topic 22's wardrobe: many adapters, one base, per-request), and prefix caching for shared system prompts.
Its second face is just as important: the offline batch engine for Topic 36's bulk work —
from vllm import LLM, SamplingParams
llm = LLM("Qwen/Qwen2.5-7B-Instruct")
outputs = llm.generate(list_of_50k_prompts, SamplingParams(max_tokens=400))— which is exactly how you'd run your Lesson 3 synthetic-data pipeline at real scale, or a 100K-item classification job overnight.
Summary
The open-source GPU serving standard: paged KV, continuous batching, multi-LoRA, OpenAI-compatible — plus a max-throughput offline mode for bulk jobs.
Mental model
The restaurant operations system from Topic 37, shipped as a pip package.
Mistakes to avoid
Trying to run it on your Mac (it's CUDA-centric; Mac is MLX/llama.cpp territory), and leaving --max-model-len at a model's full 128K default — you'll allocate pantry for context nobody uses and wonder where your batch size went.
Exercise
Topic 42: MLX — your M4's native tongue
MLX is Apple's own ML framework, built by Apple researchers specifically for Apple Silicon — and it exists because of the architecture you learned in Topic 30: unified memory. On a Mac there is no CPU↔GPU divide to shuttle data across; MLX is designed around that, with arrays living in shared memory and operations running wherever's best, zero copies. It's not a port of a CUDA-world tool; it's native.
For LLM work, the package is mlx-lm:
pip install mlx-lm
mlx_lm.generate --model mlx-community/Qwen2.5-7B-Instruct-4bit \
--prompt "explain KV cache in one line"The mlx-community org on Hugging Face hosts thousands of pre-converted, pre-quantized models (its own format, not GGUF — the one fork in the diagram's arrow).
But here's the headline for you specifically: mlx_lm.lora fine-tunes on the Mac itself. LoRA and QLoRA training, natively on M-series — meaning your Topic 25 exercise ("what can my M4 train?") has a concrete runtime: your machine isn't just an inference box, it's a small training rig. And at the high end, unified memory changes what's possible: a 128 GB Mac Studio runs 70B+ models that no consumer GPU can fit — Topic 30's "fits vs fast" trade in its most extreme form, since the Topic 34 bandwidth law still sets the speed within each M-chip tier.
Performance position: on Apple hardware, MLX is competitive with or ahead of llama.cpp's Metal backend for many workloads, and tools like LM Studio now let you pick either engine per model.
Summary
Apple's native framework exploiting unified memory; mlx-lm for inference, mlx_lm.lora for on-Mac fine-tuning; the performance ceiling for M-series machines.
Mental model
llama.cpp made the Mac a supported platform; MLX makes it a first-class one.
Mistakes to avoid
Expecting GGUF files to load (MLX has its own converted models — check mlx-community first), and expecting GPU-class training speed — your M4 trains adapters conveniently, not quickly; it's for small runs and iteration, with rented GPUs for the serious jobs.
Exercise
Topic 43: Hugging Face — the town square
Not a tool — the place. Every topic in this course has quietly routed through it: models pulled, datasets loaded, tokenizers inspected. Its gravity comes from network effects, exactly like GitHub's: it's where models are released, so it's where everything integrates, so it's where models are released.
Three layers to know:
The Hub: ~2M model repos, datasets, and Spaces (hosted Gradio demos — the standard way to ship a playable demo of your fine-tune). The professional skill here is reading a model card critically: the license (Topic 11 — Apache vs restricted, read before shipping), the files (safetensors shards vs GGUF vs MLX variants — now you know which world each belongs to), gated models (Llama-style click-through licenses), and the community tab where quantization issues and chat-template bugs surface first.
The libraries — you've used them all; here's the org chart: transformers (models + tokenizers — your AutoModel, apply_chat_template), datasets (your load_dataset), tokenizers (the fast BPE engine under Topic 4), accelerate (device/multi-GPU plumbing under everything), and peft/trl (Part 2, momentarily). One new habit worth naming: safetensors is the standard weight format because the older pickle-based .bin files could execute arbitrary code on load — safetensors is inert data, memory-mappable, and the reason "download a model" stopped being a security event.
Distribution: push_to_hub() on any model, adapter, or dataset makes you a publisher. Your ~50 MB Lesson 6 adapter, your cleaned dataset with its Topic 18 data card — these are one method call away from being citable, shareable artifacts. For someone building an open-source track record, the Hub is the portfolio.
Summary
The GitHub of AI: hub for models/datasets/demos, the library stack every tool builds on, and your own distribution channel.
Mental model
The town square — everything in the diagram's two zones flows through it, both directions.
Mistakes to avoid
Downloading the first search result — check quant variants, license, and recency (the community's favorite quantizers' repos are usually the well-maintained ones). And hoarding your work locally: unpublished adapters and datasets earn nothing; published ones compound.
Exercise
huggingface-cli login, then push_to_hub your Lesson 6 adapter with a model card that states: base model, dataset size, training config (r, alpha, LR, epochs), eval loss, and license. Congratulations — you're now on the supply side of the ecosystem.
Part 2 — Training Models
Topic 44: PEFT — the adapter library
You know the methods (Topics 22–23); PEFT is Hugging Face's implementation of them, and you've already called it (LoraConfig, get_peft_model). What completes the picture is its lifecycle API — the verbs of adapter management:
from peft import PeftModel
model = PeftModel.from_pretrained(base, "you/your-adapter") # attach
model.merge_and_unload() # Topic 23's merge
model.load_adapter("you/other-adapter", adapter_name="b") # wardrobe...
model.set_adapter("b") # ...switch outfitsAn adapter on disk is two tiny files — adapter_model.safetensors + adapter_config.json — which is why they're shareable, hot-swappable, and checkpoint-cheap (Topic 26's dividend). Beyond LoRA, the same LoraConfig carries the modern refinements as flags (use_dora=True for Topic 22's DoRA), and the library implements the rest of the family tree (IA³, prompt tuning) under one interface. One genuinely fun advanced verb: add_weighted_adapter — arithmetic between adapters, blending, say, 0.7 × your-style-adapter + 0.3 × json-adapter into a new one. Task vectors as a product feature.
Summary
The standard library turning Module 3's PEFT theory into a small, consistent API: configure, attach, switch, merge, blend.
Mental model
The wardrobe's management system — hangers, tags, and a tailor who can sew two outfits into one.
Mistakes to avoid
Merging when you didn't need to (you lose the swap/stack flexibility; merge only for deployment), and version drift — PEFT/transformers/TRL move fast together, so pin versions per project or enjoy mysterious breakage.
Exercise
Topic 45: TRL — the trainer zoo
TRL ("Transformer Reinforcement Learning") is HF's official home of stages 2 and 3 — the library whose SFTTrainer ran your capstone. Its shape is simple: one trainer class per training method you've learned, all sharing the transformers/PEFT plumbing:
SFTTrainer— Topic 13–15 as code: chat templates and loss masking handled.DPOTrainer— Topic 28, the triplet-eating shortcut.RewardTrainer/PPOTrainer— Topic 27's classic pipeline, both halves.KTOTrainer— the thumbs-up/down variant your future SaaS feedback button feeds.GRPOTrainer— the modern star, worth thirty seconds of real explanation because it closes Topic 27's RLVR flag: GRPO (Group Relative Policy Optimization, the algorithm behind DeepSeek-R1) samples a group of answers per prompt, scores each with a verifiable reward (does the math check out? do the tests pass?), and treats each answer's advantage as its score relative to the group's average — eliminating PPO's fourth model (the value network) entirely. Cheaper, simpler, unhackable rewards: the recipe that trains reasoning models, runnable from a library you already have installed. Module 8 builds on exactly this.
Summary
One trainer per method from Module 3 — SFT, DPO, RLHF's parts, KTO, and GRPO for verifiable-reward RL — on shared HF plumbing.
Mental model
The gym where each of Module 3's training styles has its own station, same membership card.
Mistakes to avoid
Exercise
Read the TRL docs page for GRPOTrainer and write, in your own words, the reward function you'd define for a verifiable task you care about (unit tests for code? regex-checkable JSON validity?). One paragraph — and you've drafted your first RLVR experiment.
Topic 46: Axolotl — fine-tuning as configuration
Everything so far scripts training in Python. Axolotl takes the infrastructure-as-code stance: an entire fine-tune — base model, dataset paths and formats, LoRA hyperparameters, sequence lengths, multi-GPU strategy (DeepSpeed/FSDP) — declared in one YAML file:
base_model: Qwen/Qwen2.5-7B-Instruct
load_in_4bit: true
adapter: qlora
lora_r: 16
datasets:
- path: train_clean.jsonl
type: chat_template
num_epochs: 2
learning_rate: 2e-4axolotl train config.ymlThe value proposition is threefold: reproducibility (the YAML is the experiment — diffable, reviewable, re-runnable), the community recipe library (proven configs for most model families, so you start from a working baseline instead of a blank page), and multi-GPU without tears (the DeepSpeed/FSDP incantations that make 70B fine-tunes work across 8 GPUs are config lines, not a systems project). It's built on the same PEFT/TRL stack underneath — a declarative skin over the machinery you already understand.
Summary
YAML-driven fine-tuning on the PEFT/TRL stack: reproducible experiments, community recipes, built-in multi-GPU.
Mental model
docker-compose for training runs — declare the run, don't script it.
Mistakes to avoid
Using it as a magic box before you've written the raw pipeline once (you have — Lesson 6 — which is why its YAML keys will all read as old friends), and copying a community config wholesale without rechecking the dataset type against your actual format: Topic 15's template mismatch wears YAML clothing too.
Exercise
Translate your entire Lesson 6 capstone script into an Axolotl YAML — every SFTConfig argument has a YAML twin. The act of translation is a review of everything Module 3 taught, in fifteen minutes.
Topic 47: Unsloth — the speed layer
The promised demystification. Unsloth makes QLoRA fine-tuning roughly 2× faster with dramatically less VRAM than the vanilla stack — and the "magic" is Lesson 7's lesson applied to training: hand-written GPU kernels (in Triton) that fuse operations and cut memory traffic in the transformer's hot paths, plus manually-derived gradient math. Fewer trips to the cabinet, exact same arithmetic — like Flash Attention, it's exact, not approximate: the loss curves match vanilla to the decimal.
The API wraps what you know:
from unsloth import FastLanguageModel
model, tok = FastLanguageModel.from_pretrained(
"unsloth/Qwen2.5-7B-Instruct-bnb-4bit", load_in_4bit=True)
model = FastLanguageModel.get_peft_model(model, r=16, lora_alpha=32)
# ...then your exact Lesson 6 SFTTrainer code runs on top, unchangedIt's compatible with TRL, not a replacement — the same trainers, accelerated. Its other flagship feature closes the Lesson 6 loop with a satisfying click:
model.save_pretrained_gguf("mymodel", tok, quantization_method="q4_k_m")The whole merge → convert → quantize ceremony from Topic 29, one call. Add first-class Colab notebooks for every major model, single-GPU focus (its free tier's deliberate niche — exactly where individuals live), and GRPO support (reasoning experiments on one GPU), and you get its ecosystem position: the default on-ramp for solo fine-tuners. The reason this course taught raw TRL first is now inspectable: Unsloth automates steps you can name — which means when something breaks, you can debug it.
Summary
Fused-kernel acceleration of the standard QLoRA/TRL pipeline — ~2× faster, far less VRAM, bit-exact — with one-call GGUF export; the individual fine-tuner's default.
Mental model
The same Lesson 6 assembly line after a Formula 1 pit crew rebuilt every station — identical product, half the time.
Mistakes to avoid
Assuming speed came from approximation and distrusting the output (it's exact — take the free lunch, same as Flash Attention), and expecting free multi-GPU (that's Axolotl/raw-stack territory).
Exercise
Re-run your Lesson 6 capstone through an Unsloth Colab notebook for your base model — same dataset, same hyperparameters. Record: training time, peak VRAM, final eval loss versus your original run. Two of those numbers should improve; one should match. Knowing which is the whole point of this module.
The Decision Table
The module, compressed into the card you'll actually use:
| Situation | Reach for |
|---|---|
| Run a model on my machine, now | Ollama |
| Max performance / training on a Mac | MLX |
| Serve real concurrent users on GPUs | vLLM |
| Edge devices, custom quants, benchmarking | llama.cpp direct |
| Bulk offline generation/classification | vLLM offline mode |
| First fine-tune, one GPU/Colab | Unsloth |
| Reproducible/team/multi-GPU fine-tunes | Axolotl |
| Custom training logic, full control | raw PEFT + TRL |
| Everything above finds its models/datasets | Hugging Face |
And your personal stack, given your hardware: MLX + Ollama locally on the M4, Unsloth on Colab (or a rented 24 GB GPU) for training, vLLM the day something you built needs to serve strangers.
Module 5: complete — and with it, the entire "models" half of this curriculum. You can now understand, train, compress, and run LLMs with every major tool placed on one map.
Next: Module 6 — RAG & Memory. The course pivots from shaping models to building systems around them: RAG in full (the "facts" half of Topic 12's mantra, finally getting its own module), vector databases (Lesson 2's embeddings grown into infrastructure), chunking (deceptively simple, endlessly consequential), retrieval pipelines (hybrid search, reranking), semantic search, and memory systems (how the goldfish from Topic 5 gets a past). This is where your Lesson 2 exercise — that 10×10 similarity grid — turns out to have been the seed of a production architecture.